


Tilt-shift lenses remain one of the most misunderstood tools in professional photography—not because they are complicated in theory, but because most explanations skip the “why it matters in practice” part. This guide covers the working principle of tilt-shift lenses from the ground up, paired with real commercial shooting cases to show exactly when and why to reach for one.
What a Tilt-Shift Lens Actually Is
This section answers: How is a tilt-shift lens structurally different from a standard prime?
A tilt-shift lens—also called a perspective control (PC) lens—is a specialized optic engineered to physically move its optical center relative to the camera sensor. Unlike a fixed prime locked along the optical axis, a perspective control lens contains two independent mechanical axes:
Shift axis: translates the lens parallel to the sensor plane (up/down or left/right)
Tilt axis: rotates the lens plane relative to the sensor plane
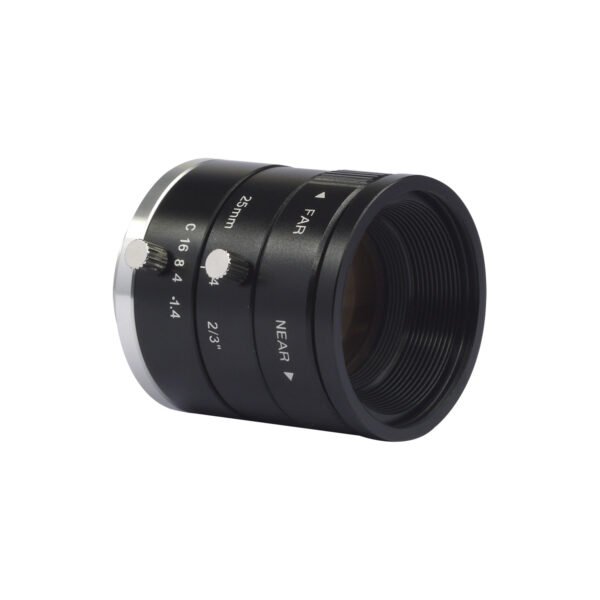
This requires a significantly larger image circle than a conventional lens of the same focal length. The 50mm f/1.7 lens shown in this article features a precision-machined all-metal barrel, a dedicated aperture ring (marked f/1.7 through f/22), a clearly indexed shift scale, and MC (multi-layer) anti-reflection coatings—all indicators of the higher optical and mechanical standards this category demands.
The Shift Mechanism: How Perspective Control Works
This section answers: What optical principle allows “shift” to eliminate converging verticals without tilting the camera?
When you tilt a conventional camera upward to capture a tall building, the sensor is no longer parallel to the facade. The result: vertical lines converge toward the top of the frame—the familiar “falling building” distortion.
Shift solves this without moving the camera body. By physically displacing the lens upward while keeping both the lens plane and sensor plane parallel, you raise the field of view while the sensor stays perfectly level. The result is geometrically correct verticals with no post-processing required.
A secondary benefit is clean multi-frame stitching. By shifting left → center → right without touching the camera body, each frame shares the same nodal point. Stitching becomes trivially clean, and the final image carries substantially more resolution than a single capture.
The Tilt Mechanism: Scheimpflug in Practice
This section answers: How does tilting the lens change the focal plane, and what does that unlock for depth of field control?
Standard lenses follow one rule: the focal plane is always parallel to the sensor. Tilting the lens breaks this deliberately. When the lens plane is angled relative to the sensor, the focal plane rotates to intersect both planes at a common line—this is the Scheimpflug Principle.
What this means in the field:
A product shot of a flat tabletop at a 45° angle can be sharp front-to-back at f/1.7, with no focus stacking required
A receding landscape plane (a road, a crop field) stays fully resolved without stopping down to f/16—avoiding diffraction softness
Deliberately reversing the tilt creates an extremely shallow, angled focal plane: the optical basis of the “miniature effect”
The practical insight: depth of field becomes a shape you control, not just a thickness you adjust.
Three Commercial Application Cases
This section answers: In which real-world scenarios does a perspective control lens deliver results that other tools simply cannot replicate?
Case 1 — Architectural & Interior Photography
Shooting a hotel lobby with high ceilings in a tight corridor: shift upward, keep the camera level, and capture full height without any keystone distortion. The client receives a file that requires zero perspective correction in post—a clean deliverable with no edge-pixel degradation.
Case 2 — Commercial Product / Food Photography
Overhead flat-lay of a full dining table: tilt the lens to align the focal plane with the tabletop surface. Every dish stays sharp at a wide aperture. Compared to focus stacking (which requires 10–30 captures plus merge time), a single tilt-adjusted frame is faster and avoids the halos that stacking can introduce around complex edges like glassware or cutlery.
Case 3 — High-End Commercial Portraiture
Combining the 50mm focal length’s natural perspective with a controlled shift produces medium-format-like spatial rendering on a full-frame body—a spatial quality that cannot be replicated by dragging a slider in Lightroom or Camera Raw.
Optical Correction vs. Post-Processing: A Direct Comparison
This section answers: When does investing in a tilt-shift lens make more practical sense than fixing it in software?
Dimension | Optical Tilt-Shift | Photoshop Perspective Warp |
Pixel utilization | 100% of sensor used | Significant crop required after correction |
Edge sharpness | Preserved by design | Stretched pixels, visible quality loss at corners |
Bokeh rendering | Optically natural transition | Artificial blur artifacts on complex edges |
Post-processing time | Minimal | High, especially for batch workflows |
Result on moving subjects | Real-time and reliable | Not applicable—requires a static scene |
Skill requirement | Moderate (technique-dependent) | Low (any operator can apply it) |
The honest conclusion: if you shoot architecture or commercial product work with any regularity, the time saved across a project batch often justifies the tool within a single assignment.
Step-by-Step: Getting Your First Tilt-Adjusted Shot Right
This section answers: What is a reliable on-set workflow for a photographer using a perspective control lens for the first time on a commercial job?
Reset all axes to zero. Confirm both the shift and tilt scales read 0 before composing.
Level the camera. Use the in-camera electronic level or a hot-shoe bubble level—this is non-negotiable for shift work.
Compose at zero and identify your near/far focus points. Note the closest and furthest critical detail you need sharp.
Apply tilt incrementally. Rotate the tilt ring in small steps (1–2° at a time), refocusing after each adjustment.
Confirm with focus peaking or magnified live view. Do not rely on the optical viewfinder alone at wide apertures.
Lock your axes. Once dialed in, tighten the locking rings to prevent drift during the shoot sequence.
Shoot a test frame and inspect all four corners. Pixel-peep before committing to the full series.
Common Pitfalls We See on Real Projects
Not leveling the camera first. Shift corrects one axis of perspective. If the camera body itself is tilted, shift will not save you—it compounds the problem.
Combining tilt and shift simultaneously before mastering each axis separately. Each axis affects the other’s effective range. Learn one at a time.
Expecting tilt to substitute for stopping down. Tilt rotates the focal plane; it does not increase total depth of field. A scene with strong 3D depth still requires a smaller aperture.
Ignoring corner vignetting at maximum shift. At full shift, even a large image circle can show falloff depending on aperture and sensor size. Always test before the shoot, not during.
FAQ
Q1: Do tilt-shift lenses require autofocus to be useful?
No. Most perspective control lenses are manual focus by design. The tilt axis makes reliable AF geometrically impractical—manual focus with live view magnification is the standard professional workflow.
Q2: Can this 50mm tilt-shift be used on an APS-C (crop-sensor) body?
Yes. The larger image circle actually gives you more effective shift range on a crop sensor before hitting vignetting. The equivalent focal length will be approximately 75–80mm depending on the specific crop factor.
Q3: Is the miniature effect better achieved in-camera or in post?
It depends on your subject. For static scenes with a clear foreground/background separation, in-camera tilt produces a smoother, more optically natural result. For video or moving subjects, post-processing filters are more practical.
Q4: How do I know exactly how much tilt to apply?
There is no fixed formula—it depends on the angle between the camera axis and the subject plane. The practical method is to apply tilt while monitoring focus peaking in live view, adjusting until both the nearest and farthest critical points appear sharp simultaneously.
Q5: Does a wider maximum aperture (f/1.7) matter on a tilt-shift compared to a typical f/3.5 PC lens?
Yes, in two concrete ways. First, it improves live view brightness for focusing in dim interiors. Second, it expands the range of depth-of-field effects achievable through tilt. The trade-off: wider apertures are more sensitive to small tilt errors, so precise mechanical adjustment becomes more important.